2015-11-01

The New Shed - Phase 9

When I started working on the new shed/garage/workshop/storage building in 2014, I thought that I would have the entire thing done before the snow came. Now, here we are in November of 2015, and there are still no walls. At least there is a solid foundation to build on.

October 22

October 22

October 22

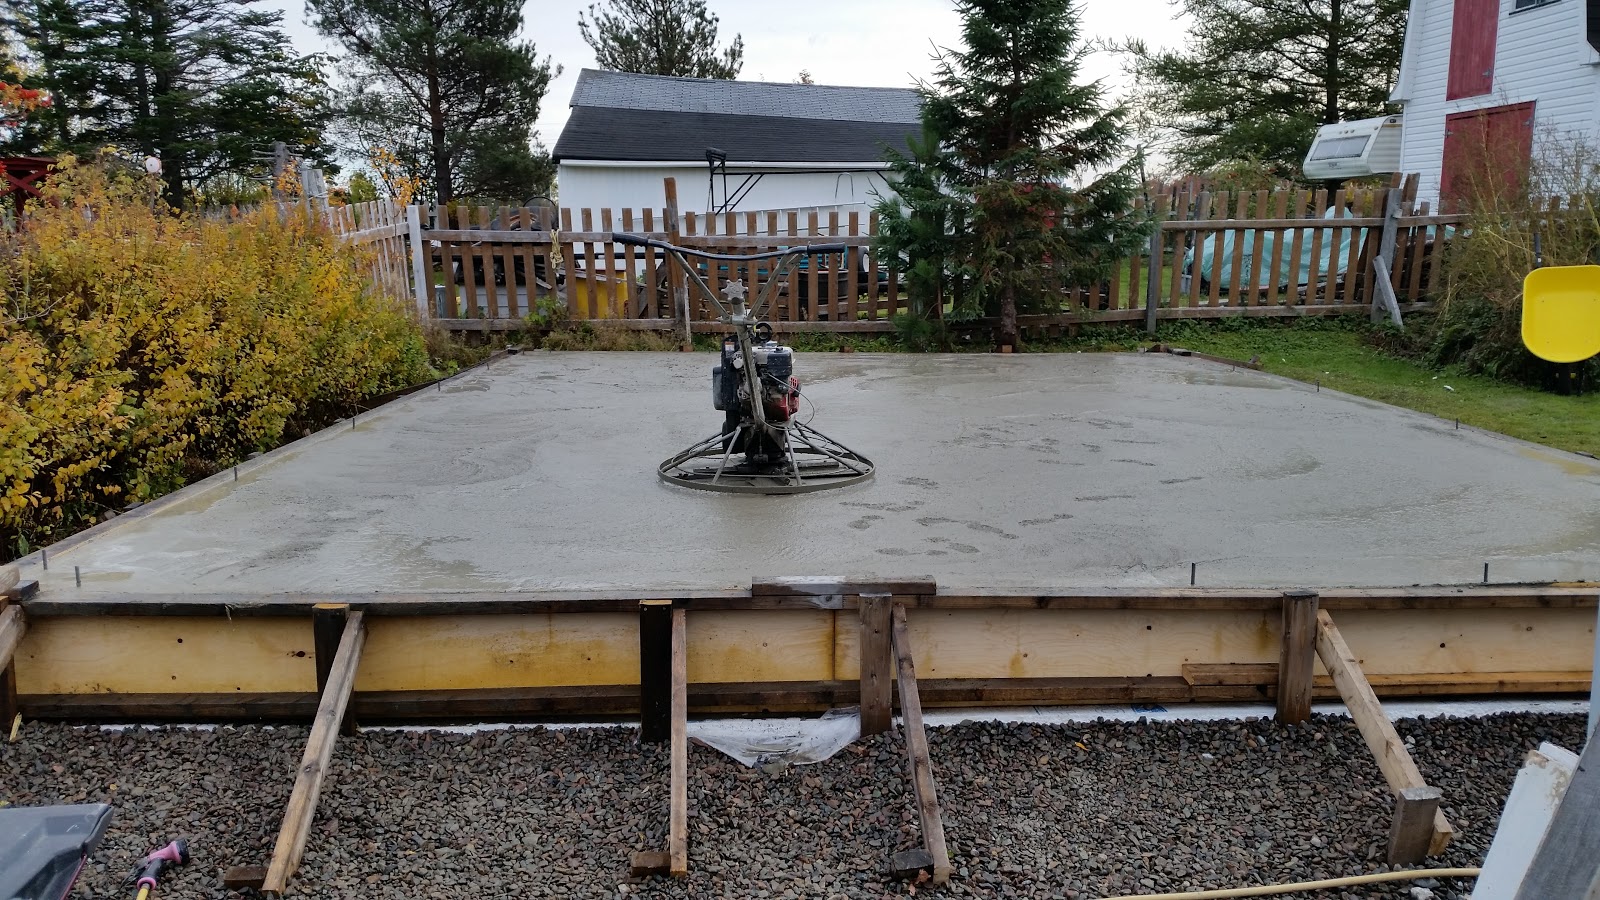
Jim came back to help with the concrete pour, and I also hired a guy with more experience, Barry, for a couple of hours. It looked pretty good after it was floated. Once it had setup a couple of hours, I was able to push in the wall anchor L-bolts.

October 22

To give the floor a nice finish, I rented a power trowel. This machine also goes by "whirlybird", "helicopter" and so on, due to its blades.

Sample Power Trowel/Float

After the concrete had been setting up for about 6 hours, I gave it a try, but it was still too soft, and I just made a mess. Every hour or so after that I tested it, but it wasn't until about 8PM, about 10 hours after the pour, that the front was firm enough. The rear, however, still wasn't that great at 11pm. It was too late in the night to be running the motor, and I had had enough, so we just covered it with a tarp to protect the concrete from the rain expected in the middle of the night, and went to bed.

October 22

October 23

After the concrete had be sitting inside the form for a couple of days, I took it apart. Weeks of construction, and attention to detail were only for a temporary structure. I had seen the results of forms that had failed, either partially or fully, and I made mine strong. It had done well, but was no longer needed. Hopefully, I'll be able to reuse the plywood and 2x4s later in the project.

October 24

Now exposed to air, the concrete can fully cure. In another few days it will be ready to support walls and a roof.

October 31
The days, however, are getting colder, with fewer daylight hours. It is just about dark by the time I get home from work, and the weather is usually poor on the weekends. Looks like the framing and final construction will be delayed until the spring. What's another year?


The Entire Story To Date:

The New Shed - Phase 8
The New Shed - Phase 7
The New Shed - Phase 6
The New Shed - Phase 5
The New Shed - Phase 4
The New Shed - Phase 3
The New Shed - Phase 2
The New Shed - Phase 1

2015-10-22

The New Shed - Phase 8

This phase of the project deals with the final preparations before concrete could be poured. The top rails of the form were level and square to make sure that the finished concrete is level and square. The lower ones were just there to hold the lower part of the plywood in place. Some had been installed last year, but with the grade being raised so much, they were now too low, and had to be adjusted. I decided not to put them in until after the styrofoam.

October 12

The styrofoam I wanted to use was not in stock, so I had to wait for a few days to have it delivered. Along with it came the wire mesh, rebar and plastic.

October 17

October 17

The first item to go down was the 6 mil vapour barrier. I considered skipping this step since the shed was going to be so much above grade, but it was not a big expense, so I went ahead with it. It will help keep any ground moisture from getting up into the concrete, and damaging it from below.

October 17

The insulating layer is Foundation Plus. It is the beaded type of foam, rather than the more solid type, and is supposed to both breathe and allow water to pass down through. It is rated for below concrete slabs, and the idea is to help keep frost out, while also providing support. The R value is a modest 7.5, so I am not expecting a lot of cold protection.

October 17
October 19

With slopes and odd angles, it took a while to get all the styrofoam in place. There was a small weather window of warmish weather coming up, so we worked some late evenings to get things done. Fortunately, I have a recently retired friend, Jim, who was willing to give me a hand.

October 20

Getting the plywood to fit was more of a challenge than the styrofoam. There were slopes and a little bit of unevenness to deal with. Each piece required multiple cuts. After that process, it was just a matter of laying out the mesh, and putting in the rebar.

October 21
To do the rebar, I supported the horizontal sections on 4x4s, and 2x4s on edge, to get them roughly 3.5" up into the concrete footing around the perimeter. Then, in the corners and as required to provide support, verticals of various lengths were hammered into the ground, staying under the top of the concrete by about 1". All the connections were wired together. This process went on right up to just minutes before the ready-mix truck arrived, at 8:55, Thursday, October 22, 2015.


The Entire Story To Date:

The New Shed - Phase 7
The New Shed - Phase 6
The New Shed - Phase 5
The New Shed - Phase 4
The New Shed - Phase 3
The New Shed - Phase 2
The New Shed - Phase 1

2015-09-30

The New Shed - Phase 7

Before the load of crushed stone could be spread, the gravel had to be compacted. All the rain and walking over it has helped a lot, but it needed to be packed down as evenly as possible. Enter the "tapper"! An 8" x 8" metal weight attached to a stick, that is also a great workout for the arms.

September 5

While moving the pile of crushed stone, another expense came up. The handle of the wheelbarrow, which I had repaired last year, started to give way. The wood just could not stand up to the many heavy loads. The new wheelbarrow has metal handles, and came in a pretty yellow colour.

September 5

The stone had to be distributed more evenly and level than the gravel, since this was the last layer before the styrofoam. This was to ensure that the final thickness of concrete was correct at a minimum of 4".

September 12

September 12

The form was rechecked and the string tied across again to measure down from. It advanced as the stone was spread. The depth of the stone was also checked at regular intervals to make sure it was around 3".

September 19

It takes many trips with a wheelbarrow to move a big pile of rock, and since it could only be done on evenings and weekends when the weather cooperated, it seemed to take forever. Occasionally, however, I did have a helper to speed things up.

September 19

Keeping at something, eventually it will get done. Preparing for concrete was the most time consuming part of the entire shed project, and took over a year to get to this point.

September 28

Another session of tapping the top, followed sloping and tapping the footing area, meant that this job was finally done. But, before I could completely move on from the gravel and rock work, I had to make sure that the cement mixer could get back to the form. That meant another day of moving class A to a new location, and spreading out the stone at the back of the driveway.

September 30

September 30

With no more wheelbarrow loads required, the form can now be completed. It is quite a relief finally getting to this point.


The Entire Story To Date:

The New Shed - Phase 6
The New Shed - Phase 5
The New Shed - Phase 4
The New Shed - Phase 3
The New Shed - Phase 2
The New Shed - Phase 1

2015-08-31

The New Shed - Phase 6

So, here we are at the end of August, more than a year after starting work on the new shed/garage/workshop, and there is not much to show for it. Last summer we stripped the sod, started framing the form, and spread a truck load of gravel. This year, what we have done is level the form again, and spread another load of gravel.

April 28

July 18

Not to make excuses,  but this year time and weather have been against us. Work had to completed on the sailboat so that it could be moved out of the way. A lack of local supplies delayed that a few weeks pushing us into July. Before that, the ground was too wet and soft from the winter snow melt and spring rains.

July 25

The month of July itself was the worst in about 20 years. It was cold and wet, with bitter winds out of the north most days. On the good days my job took priority, as we struggled to keep up with the workload caused by the weather delays.

August 29

Now that the second load of gravel has been spread and levelled, the crushed stone can be delivered. Once that is distributed, the form can be completed, foam laid, and concrete poured.
I'm still hopeful of getting the shed closed in this year. The foundation is the most difficult and time consuming part. There is a team of friends and family ready to help with the framing, and we can probably work until the end of November on the exterior. Inside work can take place all winter.

2015-05-29

The Petrel Project - Update 1

In my previous post, I talked about how water was entering the cockpit while sailing. The cockpit drain plugs have been disassembled, gone through a rust removal process (brushed, sanded, WD40), and reassembled. After a recent bit of rain, however, it appears that they were not the source of the leak. Even with the inside of the boat dry, water is dripping from the bottom of the boat around the area of the centerboard trunk.


A closer inspection showed that a section of the floor is pushed up. When you push down on it, water exits from one of the seams. So, the flotation foam is saturated, and water is able to flow both in and out of the boat via this route. Since the boat did not leak last year, winter ice must have done the damage.

Water leaking out. It looks like the hull was patched before.

This could be a scary repair, requiring drilling out rivets and partially dismantling the boat to get at the problem. That is not something I want to tackle this summer, so my next challenge will be to find the source of the leak, and just patch it for this summer.

Water is entering along this seam.

In the meantime, the Petrel will have to stay parked until I get time to work on it later in the summer.